
If you are new to Angular and have somehow stumbled upon this blog…kudos🎉 your search ends here.
Let’s learn Angular from scratch…
Soooo… what is Angular again???
Angular is a Javascript framework that allows you to create reactive Single-Page-Applications(SPAs).
Note: you need to install Angular CLI to create applications on the Angular framework and to use this CLI, you need to have Node JS in your system.
You can install angular using the below command
npm install -g @angular/cli//you can create project using the below command
ng new first-angular-app --no-strict --standalone false --routing false
//change directory to your project folder
cd .\first-angular-app\
//start development server to review your Angular application on browser
ng servenow, browse localhost:4200 in your favorite browser and you should see something like this
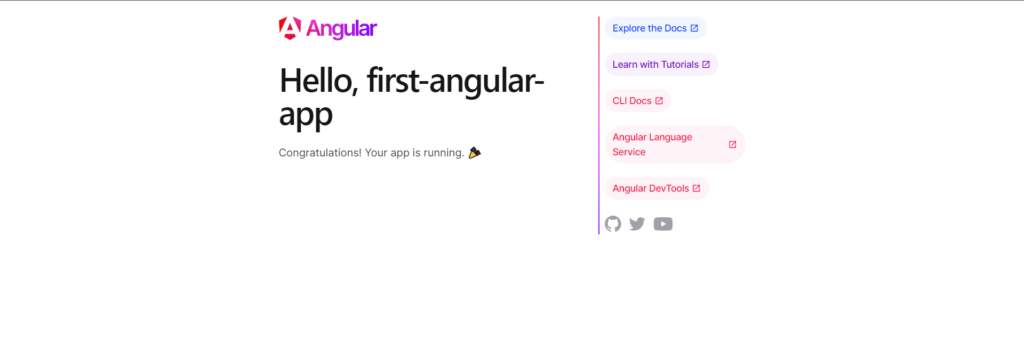
Congratulations🎉🎉 your first Angular application is ready for action.
Let’s see how an Angular application loads on a browser
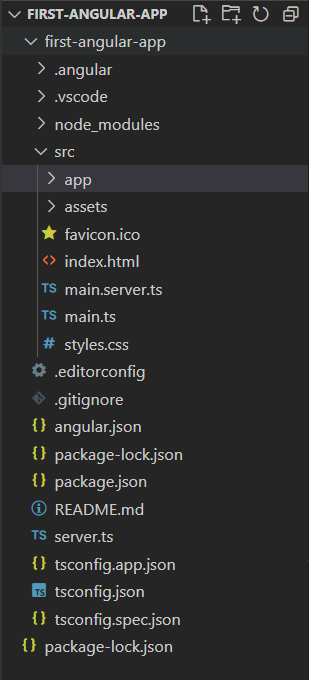
At this moment, you should somewhat be able to see a folder structure as you see on the right.
Whenever an Angular application loads, the first file to get loaded on the browser is index.html
If we open our index.html we can see a component like
<app-root></app-root>This <app-root> is not an HTML tag, so how does the application know where to get it from??
In an Angular application, the first code to get executed is in main.ts
platformBrowserDynamic()
  .bootstrapModule(AppModule)
  .catch(err => console.error(err));
The bootstrapModule starts the angular application by passing the AppModule.
The AppModule being passed to the bootstrapModule is imported from the app.module.ts file.
If you check the app.module.ts file, you will find the below code.
@NgModule({
  declarations: [
    AppComponent
  ],
  imports: [
    BrowserModule
  ],
  providers: [
    provideClientHydration()
  ],
  bootstrap: [AppComponent]
})
export class AppModule { }
in the above code, bootstrap is an array that lists all the components that should be known to Angular at the point in analyses our index.html file and here we can see that AppComponent is mentioned in it.
But we need to know what <app-root> means, how does AppComponent help us achieve that??
Now… if you check the app.component.ts file, you can see the below code
//Don't worry about what @Component means for now
//We will be covering it eventually
@Component({
  selector: 'app-root',
  templateUrl: './app.component.html',
  styleUrl: './app.component.css'
})
export class AppComponent {
  title = 'first-angular-app';
}
So here you can see that AppComponent is a class whose selector is app-root and if you check the code in templateUrl (i.e., ./app.component.html in this case), you will find the HTML code that would be shown on the browser when <app-root> is used.
Components in Angular
Components are the main building blocks for an Angular application.
There are two ways of creating components in Angular :
- creating components manually
- using the CLI
Let’s go through each one step by step.
Creating Components Manually
Now before we start creating our components let’s understand the only component that we have in our application till now, the app component.
The app component is a special component as it serves as the root component.
The given code is the code in app.module.ts
As you can see the AppComponent class is mentioned in bootstrap which tells our application that the app component is a root component and should be accessible throughout the application as this will be the component that will be added to or index.js
Other components that we create will not be added to bootstrap and hence cannot be used in the index.html
import { NgModule } from '@angular/core';
import { BrowserModule, provideClientHydration } from '@angular/platform-browser';

import { AppComponent } from './app.component';

@NgModule({
  declarations: [
    AppComponent
  ],
  imports: [
    BrowserModule
  ],
  providers: [
    provideClientHydration()
  ],
  bootstrap: [AppComponent]
})
export class AppModule { }
Now coming back to creating a new component…
Whenever we want to create a new component we will first create a folder inside the app folder with a suitable name for our component(for example, I wanted to have a component about cakes 😋).
Now this new component must contain two files:
- {componentName}.component.html
- {componentName}.component.ts
Note that a component is just a Typescript class, so Angular can instantiate it to create an object, based on the blueprint we set up here.
Let’s create our cake.component.ts
import { Component } from "@angular/core";

// In order to inform Typescript that this class is a Component,
// we add a decorator @Component which we import from
// @angular/core

// To the @Component decorator we need to pass a JavaScript object

@Component({
    selector: 'cake',
    // selector will contain the HTML tag that we want to make using this component
    templateUrl: './cake.component.html'
    // templateUrl contains the location to the HTML code for this component
  })
  export class CakeComponent{
    // The naming convention is that the class should be named like
    // {name of the component} + 'Component'
    // The business logic for the component cames here
  }
and cake.component.html
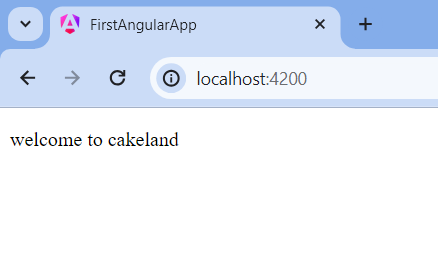
<p>welcome to cakeland<p>Now you need to inform angular that there is a new component that can be used.
To do that you need to add your custom component in the app.module.ts
import { NgModule } from '@angular/core';
import { BrowserModule, provideClientHydration } from '@angular/platform-browser';

import { AppComponent } from './app.component';
import { CakeComponent } from './cake/cake.component'; // Remember to import your custom component correctly

@NgModule({
  declarations: [
    AppComponent,
    CakeComponent // Add your custom components here
  ],
  imports: [
    BrowserModule
  ],
  providers: [
    provideClientHydration()
  ],
  bootstrap: [AppComponent]
})
export class AppModule { }
Now all you need to do is use your component in some other component’s HTML file.
Let us remove all the code currently present in app.component.html and just use our component in it.
So now our app.component.html and final output page on screen would look like this.
Congratulations you have created and used your first custom component 🎉🎉
<!-- using custom component in app.component.html -->
<cake></cake>